It is common to recover the surface of your pool table before the rails need recovering and or replacement. This is an overview of how to refelt the surface of your Irving Kaye pool table.
 Locate rubber trim around the edge of the table and carefully remove this and set aside. Remove the six rails by using a phillips head screwdriver. Number each rail with a Sharpie and place corresponding numbers on the table behind the rails so you can reinstall the rails in the same location.
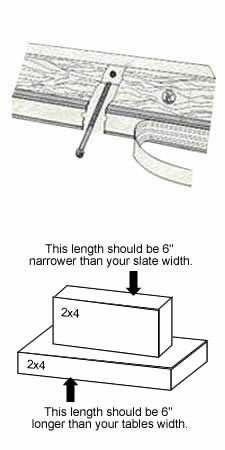
- To support the slate while you are working screw together three 2×4 tees. The base of the tees should be slightly longer than your table is wide and the verticals should be slightly shorter than your slate is wide.
- Have your assistant(s) lift each end of the slate as you slide the tees underneath. Rest the slate on the vertical sections of 2×4. This will allow you to work on the bottom of the slate.
- Remove the old, glued on felt until you expose the entire bare slate. Clean off any chalk dust and residue so you have a clean surface to work with. Do not use any liquid cleaning solutions or spray. Be sure to scrape away any glue that is in front of the pocket openings as you do not want new glue on top of old glue creating a “lip” in front of the pockets.
- Locate your felt and unfold it. Align the nap of the felt in the direction the cue ball rolls when breaking. Unroll section or cut it larger than your slate area. Then trim it off with your box cutter. Make sure the trim hangs over the edges of the slate so you can glue the felt to the bottom of the slate.
- Use newspaper and cover the sides of the pool table and the exposed slate to protect them from the over-spray of the glue adhesive.
- Fold over the felt so the bottom of the felt is exposed. Trim part of felt you will eventually attach to slate and spray heavily with adhesive. Also spray the bottom of the slate and let is sit until it gets tacky. Then, repeat on the other end of the pool table while the end you spray first is drying.
- Return to the end you sprayed first and make sure it is tacky and ready to adhere. Then, adhere and pull the felt tight underneath, fastening to the slate. Repeat this process on the opposite end. Now you have fastened end to end.
- Repeat this process on the sides. Go to first side, spray in an up and down manner, attach the felt and repeat. Pull tight until you have flat felt, you do not want any wrinkles. At this point, your pockets are not cut yet.
- With each of the pockets, take your box cutter, go underneath the slate and make diagonal cuts where you slate meets the corner of the felt. So you are cutting underneath the slate on a diagonal. Repeat on the other corners paying attention to where the slate bends into the pocket.
- By the time you are done cutting pockets you will have several 1/2-inch wide strips of felt hanging. You can then spray them. Tension should be across the pocket itself. Look at the width of the strips and pull it tight. The pocket is cut tight and adheres at this point and you attach any excess felt underneath on the slate while pulling it tight and spreading it out underneath. The pocket should not have any wrinkles and will appear tight at this point. Repeat this process for all pockets.
- Make sure you cover all cloth when spraying over it. Repeat process for all six pockets.
- Lift the slate removing the supports one side at a time with the aid of your helper(s). Gently and slowly lower the slate to its original position.
- Refasten the rails and reinstall the trim.